
If you scan the internet for ideas on the stock market it is virtually impossible to not come across something that warns that “the stock market is topping” and that “an impending market collapse is just around the corner”. Then we are told we should engage in “hedging.”
“Hedging” is a code word typically used in place of the phrase “I’m scared to death that I’m going to lose my a$%, but I am equally afraid of selling everything and risking getting left behind.”
It’s a complicated world we live in, no?
The Out-of-the-Money Butterfly Spread
In “option jargon”, an OTM butterfly spread involves:
- *Buying, well, an out-of-the-money put option (what else?)
- *Selling two lower strike price put options
- *Buying on even lower strike price put
The idea behind this strategy is to risk a relatively small dollar amount but to also have the potential to make money quickly if your perceived worst case scenario unfolds.
Figure 1 displays the SPDR S&P 500 ETF (ARCA:SPY). Technical analysts might argue that a multiple top formation has been formed and that the upper red line on the chart could act as “resistance.” On the downside there are two potential “support” areas displayed.
 SPY with potential support and resistance levels (Courtesy: AIQ TradingExpert)
So a trader may desire to hedge against a decline down to one of those resistance levels, but may not want to risk a lot of money. Let’s turn to OptionsAnalysis and the built in OTM Butterfly Finder routine.
The input screen appears in Figure 2. Figure 2 – OTM
Figures 3 and 4 display the details of the top ranked OTM Put Butterfly for ticker SPY.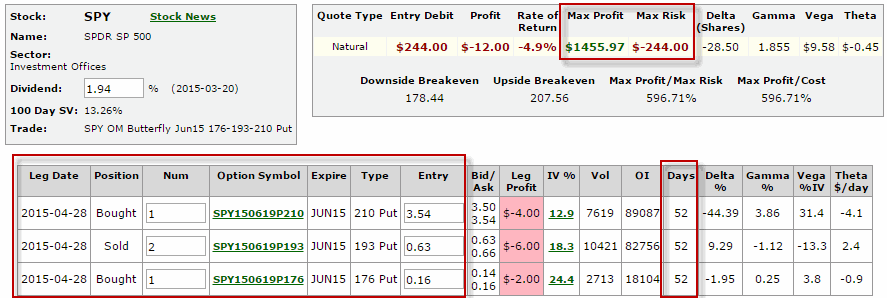 Figure 3 – SPY Jun 210-193-176 OTM Butterfly put spread (courtesy: Optionsanalysis.com)
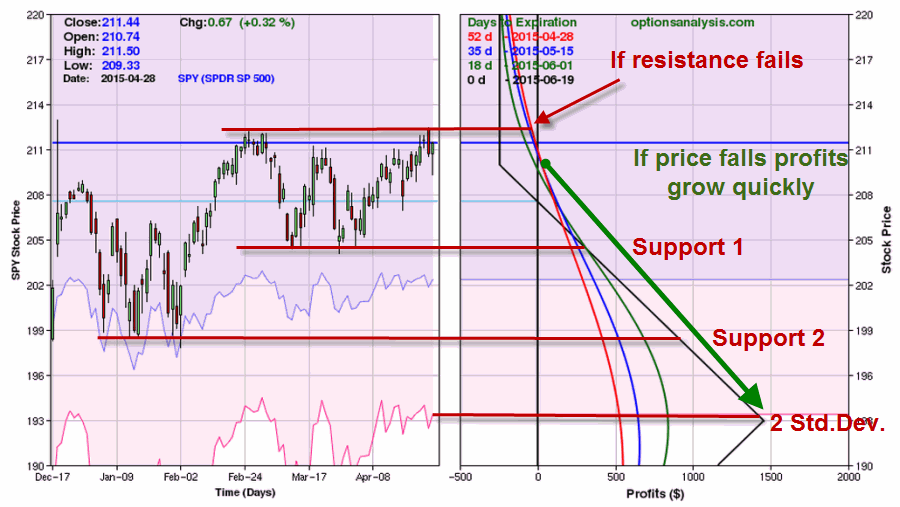 Figure 4 – Risk curves for SPY Jun 210-193-176 OTM Butterfly put spread (courtesy: www.Optionsanalysis.com)
The four colored lines on the right-hand side of the chart in Figure 4 display the profit/loss expectations for this trade at different price levels for SPY on four different dates leading up until June option expiration.
The Outlook
Please note that I am not “predicting” a stock market pullback here. I am merely highlighting an example of a potential hedge position that:
A) Risks only a maximum of $244.
B) Might be exited with an even smaller loss if price breaks out above resistance prior to expiration.
C) Can generate a profit of $250 to $350 if price falls to Support 1.
D) Can generate a profit of $400 to $900 if price falls to Support 2.
E) Can generate a profit of $500 to $1400 if price falls 2 standard deviations.
Summary
Hedging can feel at times like a “lose/lose” proposition. If the thing you are hedging against (for example a decline in the stock market) does not occur you may come away feeling like you wasted money by entering into a hedge position. Likewise, if the thing you are hedging against does occur, in many cases your hedge will cover only a portion of your portfolio loses, thus while you may be glad you hedged, in the end you still may have suffered an overall loss.
As a result, it is important to remember:
Jay’s Trading Maxim #202: The first rule of hedging is “risk a little to cover a lot.”
Whether the example trade I’ve highlighted here ultimately makes money or not is not the key point. The key point is that (at least in my troubled mind) it is a “good hedge” regardless of whether or not it ends up making money for the simple reason that is does what it is supposed to do – i.e., risk a little to hedge against a decline in the stock market.